Follow us on X. We're posting regular updates about everything GTA VI!
@iGrandTheftAutoDead Man Walking
Last Edited by TreeFitty December 31, 2014 : 1 Comments : 40,324 Views
|
FIB Agent Dave Norton puts Michael in a difficult situation in order to give the Bureau an edge over the IAA. Rewards: Combat Pistol, New-Gen: Heavy Pistol Protagonists: Michael |
â— GOLD MEDAL â— Accuracy Headshots Mission Time Focused Killer Unmarked |
Night night
At the observatory Michael finds his FIB buddy Dave Norton who is quite upset over the jewelry store heist. Michael admits he did it and puts his hands out to be arrested. On top of that Michael tells Dave that Trevor showed up but Michael hasn't told him anything about his deal with Dave. Dave comes to the conclusion that they both share each other's problems and that means Michael needs to help Dave keep his job. Michael doesn't have much room to refuse.Dave needs to confirm the status of Ferdinand Kerimov. The IAA says he is dead but Dave and the FIB believe he is still alive and being held somewhere. He has information that will take down Dave and his bosses. The coroner office is on lock down so Michael will need to sneak in to verify the body. When Michael asks how he'll get in Dave tells him he's played dead before and clubs him.
Wakey wakey
Later at the coroner office two examiners are shown evaluating their new corpse. They poke fun at Michael's appearance and you are given the option to get up when you choose to. When you do Michael will take out one of the examiners and the other will run. After Michael gets some clothes on an IAA guard approaches so Michael hides behind a table. When the guard goes to the opposite room Michael gets up.In control of Michael, walk up to the guard and stealth kill him. Grab the gun and head into the morgue with two bodies. Walk up to each to confirm they are not Ferdinand. The far body has his toe tag. Michael calls Dave and says Ferdinand's tag is on a woman. To escape, the first floor is on lock down but Dave has a friend that will cut the power. Michael needs to get up to the second floor.
Bass Ackwards
Start walking down the hall to exit the building as the alarm goes off. Another guard will walk around the corner so be ready. Take him out and a third will come around the corner so get him too. Note that they use stealth and cover too and do not always appear on your radar so move with caution. In the next hallway guards will come from the room on the right, the area on the left, and then the far set of doors. Move up and another guard will appear in the right room. There is a health pack on the desk counter to the left and two in the right room. When you go through the far doors another guard will exit the elevator in the next hallway. Kill him and grab his SMG. The elevator is locked out so move up the stairs. Another health pack is on the wall.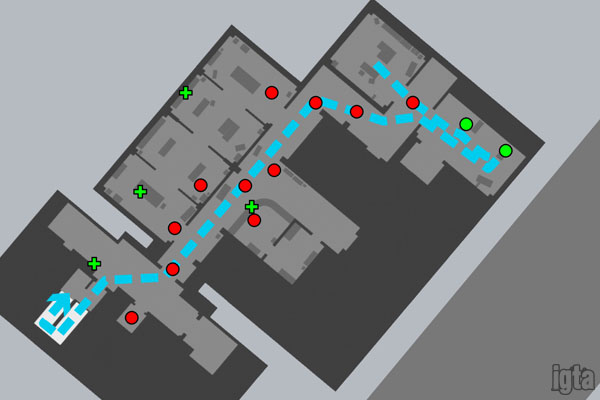
In the stairwell Dave will tell you that your weapons are in a black trash bag in the evidence room on the top floor. A guard will greet you at the top of the stairs so be ready. Move into the second floor and another guard will come from the next stairwell so kill him too. As you climb these stairs a guard will run down. Take him out and move up to the evidence room.
On the floor more guards will appear around the area with one in the room ahead and two off to the right in the back. Kill them and two guards will run up the stairs you came from. Take them out and grab the bag plus armor. Go to the window and grab the health pack just inside the final door if needed. Smash out the window and climb through. Michael jumps into a dumpster below and gets back on his feet. Back in control, escape the 3 star wanted level. There are vehicles in front of you.
Gettin' real
After losing the cops Michael will call Franklin. They need to talk and will meet near the oil derricks in East Los Santos so start heading over there. Michael then calls Dave to find out what the whole issue is. Dave says that there's a big target out there and whichever agency finds it - the FIB or IAA - will get a big boost in funding. Michael wants out but Dave won't let him go. They and Dave's boss will meet in Downtown right in between the FIB and IAA office buildings - since they never expect an inside job.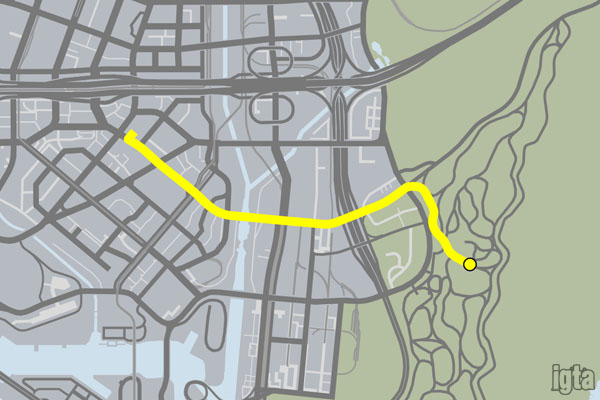
When you meet Franklin Michael tells him to get out of town. Franklin wants to know what's going on and eventually Michael cracks. He tells Franklin about his FIB situation. Michael made a deal a long time ago but the wrong person was killed so Michael entered an informal witness protection program. Michael and his FIB contact (Dave) took care of each other. Things were good until Michael came out of retirement recently and then Trevor showed up as icing on the cake.
Michael tells Franklin a little about Trevor and how they go way back. Franklin says he'll help Michael however he can since Michael helped him. He doesn't care about the FIB or Trevor. Michael can barely express his gratitude and tells Franklin to go. He does so leaving Michael on the hill alone.
Tips
- Since the alarm will go off there is no need for stealth after the first kill.
- Use cover and Michael's special ability to take down enemies without taking too much damage.
- Approach key points with caution and be ready for an enemy to pop up.
- Lose the cops by speeding off out of their sights and then zigzag through streets while making your way towards the meeting with Franklin. You should be able to stay out of view on the dirt roads in that area.
Objectives
- Accuracy - Finish with a shooting accuracy of at least 70%.
- Headshots - Kill 14 enemies with a headshot.
- Mission Time - Complete the mission within 09:30.
- Focused Killer - Kill 4 enemies using Michael's special ability.
- Unmarked - Complete with minimal damage to health and armor.
| Fame or Shame | < | Dead Man Walking | > | Did Somebody Say Yoga?
Three's Company Hotel Assassination |
All content created by and property of iGTA5.com and must not be reproduced without express written permission. © 2011-2026 iGTA5.com
Comments (1)
- SOMEONE (Guest) October 27, 2013how come i cant do this mission do i need to do some side missions?
Make A Comment
All comments are text only. Any BBCode or HTML entered will come out like it went in, so we suggest you enter ONLY TEXT.
Your comment will be posted as a Guest.
 Please Wait...